It’s pretty easy now to get your Office 365 tenant ID. Here, I will demonstrate three ways, by which you can retrieve your tenant ID :-
- Azure portal (new and old)
- PowerShell
- SharePoint Online

It’s pretty easy now to get your Office 365 tenant ID. Here, I will demonstrate three ways, by which you can retrieve your tenant ID :-
This is the first of the 2 series blog. In this, I’ll explain how to do create a read-only Office365 User, directly from the client PowerShell. And then there’s a complete code snippet to achieve the same from a C# Console App in the 2nd part of this blog[Coming soon]. Before delving deep, I would like to highlight the fact, that you’ll NOT be charged for this User a/c by Microsoft. We’ll be barely creating a User, not assigning any license to it.
The entire process can be broadly classified into 4 major steps:
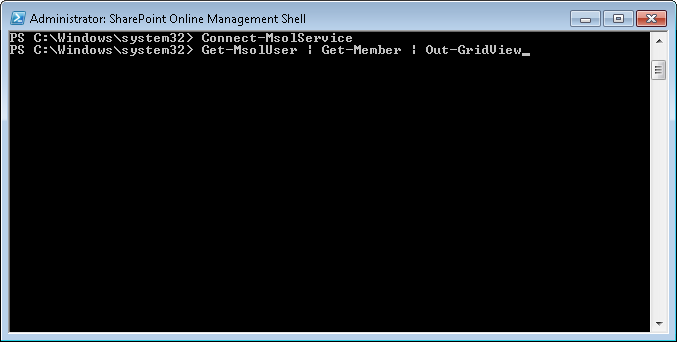
Open Windows PowerShell and enter the cmdlet,
"Connect-MsolService".
A dialogue will pop-up seeking the userId & password.

Provide an administrators credential here. Note, you’ll not be notified for wrong userID or password. In the event of providing wrong credential, the following cmdlets will refuse to run. So, make sure, that the credential is correct.
Once, the authentication is done, we’ll then create a new Office365 user. We’ll be providing basic user details, like FirstName, LastName, LoginID [or, UserPrincipal(compulsory)]. But, we’ll never set the password. The password will be returned back to us, once the user has been created. Another important thing to note here is the password policy we’re enforcing here. First, we’re setting, “ForceChangePassword” to false. This implies that when the User will login for the very first time, he/she will not be prompted to change it. Next, we’re setting “PasswordNeverExpires“, to true which, is pretty much self-explanatory.
Once the User has been created, its basic details like, UserPrincipalName, newly created Password, etc, will be displayed in the Shell. One can also specify their preferred password also by adding, “-Password “Password123” at the end of the above cmdlet.
Note: There can be multiple Users with identical DisplayName but not UserPrincipalName. It has to be unique.
This is simple. We’ll be assigning the “Service Support Administrator” role to this newly created User.
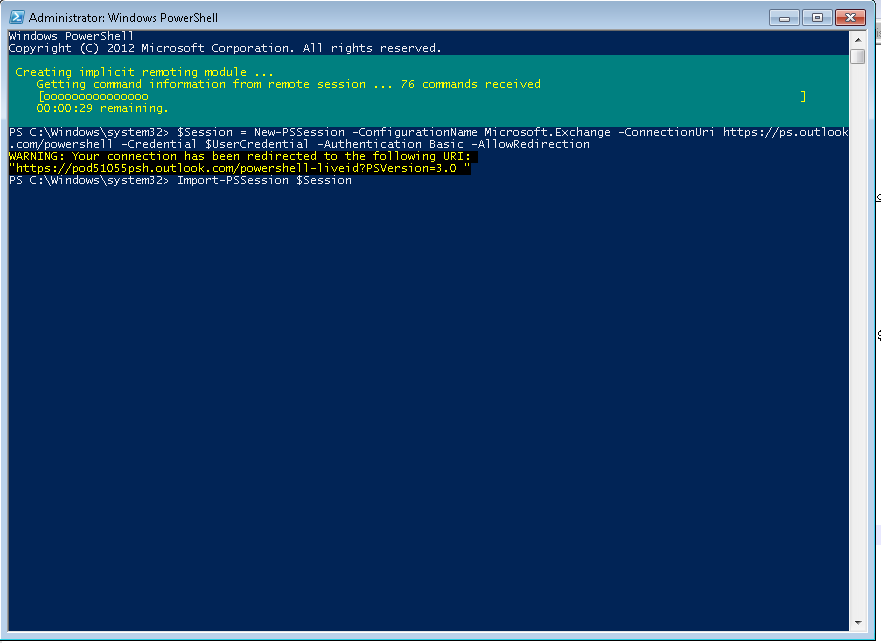
This role group is specific to Exchange. The objective is to assign only view permission to this user. To accomplish this, we’ll execute the cmdlet, “Add-RoleGroupMember“. One problem, this cmdlet is not a part of SharePoint Online Management Shell. So we cannot directly run it. We have to, first, establish a remote connection to the Exchange Server, and temporarily import it’s commands to the local PowerShell session. Only then, we can execute the cmdlet, “Add-RoleGroupMember“. Once the job’s done, we should also remove this session. To know more about this, plz visit the site, http://technet.microsoft.com/en-us/library/dd335083(v=exchg.150).aspx
Since, here, we’ll be executing a series of commands, I have put it all down in a script file. Here’s the content,
Say, we saved the file in D drive, with the name, addExchngViewRole.ps1. So to execute the same, just run from powershell, D:/addExchngViewRole.ps1. A dialog box will be prompted (same as above). Here again, you need to specify the admin’s credential. Once validated, it will import the Exchange commands.
Next, you’ll be asked to provide the PrincipalID or LoginName of the User who will be assigned to the RoleGroup, View-Only Organization Management [in this case, pk@company.onmicrosoft.com]. After that the user will be added to the given group and the current session will be removed from your machine, as per Microsoft’s guideline.
Note: ConnectionUri has been fixed to https://ps.outlook.com/powershell. This is valid for Exchange Online only. If you’re using on-premise, plz replace the url with this one, http:///PowerShell/.
SideLoading of apps is disabled by default on SharePoint sites. So in order to publish our app directly from visual studio, we need to enable this option. However, do remember that Sideloading apps is a developer/test feature not intended for production use.Before proceeding further please make sure that you have already installed the Sharepoint Online Management Shell. Next follow the steps described below:-
* Save the following code to your machine as “EnableSideLoading.ps1“.
$programFiles = [environment]::getfolderpath("programfiles")

add-type -Path $programFiles'\SharePoint Online Management Shell\' + `
  'Microsoft.Online.SharePoint.PowerShell\Microsoft.SharePoint.Client.dll'

Write-Host `
  'To enable SharePoint app sideLoading, ' + `
  'enter Site Url, username and password'

$siteurl = Read-Host 'Site Url'
$username = Read-Host "User Name"
$password = Read-Host -AsSecureString 'Password'

if ($siteurl -eq '') {
    $siteurl = 'https://mytenant.sharepoint.com/sites/mysite'
    $username = 'me@mytenant.onmicrosoft.com'
    $password = ConvertTo-SecureString -String 'mypassword!'`
                -AsPlainText -Force
}
$outfilepath = $siteurl -replace ':', '_' -replace '/', '_'

try
{
    [Microsoft.SharePoint.Client.ClientContext]$cc = `
      New-Object Microsoft.SharePoint.Client.ClientContext($siteurl)

    [Microsoft.SharePoint.Client.SharePointOnlineCredentials]$spocreds = `
      New-Object `
      Microsoft.SharePoint.Client.SharePointOnlineCredentials($username, $password)

    $cc.Credentials = $spocreds
    $sideLoadingEnabled = `
    [Microsoft.SharePoint.Client.appcatalog]::IsAppSideloadingEnabled($cc);

    $cc.ExecuteQuery()

    if($sideLoadingEnabled.value -eq $false) {
        Write-Host -ForegroundColor Yellow `
          'SideLoading feature is not enabled on the site:' $siteurl
        $site = $cc.Site;
            $sideLoadingGuid = `
           new-object System.Guid "AE3A1339-61F5-4f8f-81A7-ABD2DA956A7D"
            $site.Features.Add($sideLoadingGuid, $false, `
            [Microsoft.SharePoint.Client.FeatureDefinitionScope]::None);
            $cc.ExecuteQuery();
           Write-Host -ForegroundColor Green `
          'SideLoading feature enabled on site' $siteurl
    }

    Else {
        Write-Host -ForegroundColor Green `
          'SideLoading feature is already enabled on site' $siteurl
    }
}

Catch {
    Write-Host -ForegroundColor Red `
      'Error encountered when trying to enable SideLoading feature' `
      $siteurl, ':' $Error[0].ToString();
}

Once your job is done, make sure to disable this option. To do that run the following script from PowerShell just as it has been described above.
$programFiles = [environment]::getfolderpath("programfiles")

add-type -Path $programFiles'\SharePoint Online Management Shell\' + `
 Microsoft.Online.SharePoint.PowerShell\Microsoft.SharePoint.Client.dll'

Write-Host 'To disable sideLoading, enter Site Url, username and password'

$siteurl = Read-Host 'Site Url'

$username = Read-Host "User Name"

$password = Read-Host -AsSecureString 'Password'

if ($siteurl -eq '') {
    $siteurl = 'https://mytenant.sharepoint.com/sites/mysite'
    $username = 'me@mytenant.onmicrosoft.com'
    $password = ConvertTo-SecureString -String 'mypassword!' `
      -AsPlainText -Force
}

Try {
    [Microsoft.SharePoint.Client.ClientContext]$cc = `
    New-Object Microsoft.SharePoint.Client.ClientContext($siteurl)

    [Microsoft.SharePoint.Client.SharePointOnlineCredentials]$spocreds = `
    New-Object Microsoft.SharePoint.Client.SharePointOnlineCredentials($username, $password)

    $cc.Credentials = $spocreds

    $site = $cc.Site;

    $sideLoadingEnabled = `
    [Microsoft.SharePoint.Client.appcatalog]::IsAppSideloadingEnabled($cc);

    $cc.ExecuteQuery()

    if($sideLoadingEnabled.value -eq $false)
    {
      Write-Host -ForegroundColor Green `
        'SideLoading is alreday disabled on site' $siteurl
        }
       else
       {
      Write-Host -ForegroundColor Yellow `
        'Disabling SideLoading feature on site' $siteurl
      $sideLoadingGuid = `
        new-object System.Guid "AE3A1339-61F5-4f8f-81A7-ABD2DA956A7D"
      $site.Features.Remove($sideLoadingGuid, $true);
      $cc.ExecuteQuery();
      Write-Host -ForegroundColor Green `
        'SideLoading disabled on site' $siteurl
        }

} catch {
    Write-Host -ForegroundColor Red `
      'Error encountered when trying to disable side loading features' `
      $siteurl, ':' $Error[0].ToString();
}
For further details, visit the following site:
http://blogs.msdn.com/b/officeapps/archive/2013/12/10/enable-app-sideloading-in-your-non-developer-site-collection.aspx
get-command | Where-Object { $_.ModuleName -eq "Microsoft.Online.SharePoint.PowerShell" }
A sample list of available cmdlets are displayed in the following screenShot.

Sometimes, we might need to view all the Licensed Users within a Office365 tenant. So here, I am going to demonstrate how to get all the users for any further analysis.
But before we delve into this plz make sure that you have all the components installed on the machine to run SharePoint Online Management Shell and the cmdlet, Connect-MsolService. You can refer this blog post also for any assistance: https://realmpksharepoint.wordpress.com/2014/07/10/install-sharepoint-online-management-shell-on-client-side/
Following are the steps involve to perform this task:

Get-MsolUser | Get-MsolMember | Out-GridView
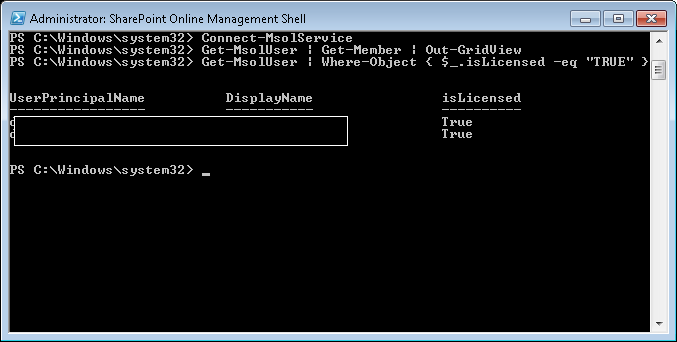
The following screen will be displayed.

Get-MsolUser | Where-Object { $_.isLicensed -eq "TRUE" }
Get-MsolUser | Where-Object { $_.isLicensed -eq "TRUE" } | Select-Object UserPrincipalName, DisplayName, Country, Department, ValidationStatus | Export-Csv c:\LicensedUsers\LicensedUsers.csv

Get-MsolUser | Where-Object { $_.isLicensed -eq "TRUE" } | Export-Csv c:\LicensedUsers\LicensedUsers.csv
The last 2 commands will not generate any message on the shell, but you can check the file at your given location.
Thanks…
